Following up on our previous post where we automated a production-ready Kubernetes cluster, this guide details how to deploy a complete OpenStack environment on top of it. We will use the OpenStack-Helm 2026.1.0 ↗ charts and manage the entire lifecycle through a GitOps workflow powered by FluxCD ↗.
This approach treats your OpenStack deployment as code, ensuring reproducibility, auditability, and simplified management.
Architecture Overview#
The deployment is managed from a central Git repository. FluxCD continuously reconciles the state of the Kubernetes cluster with the configuration defined in Git. The OpenStack-Helm charts themselves are treated as read-only upstream sources, with all customizations applied via Helm value overrides.
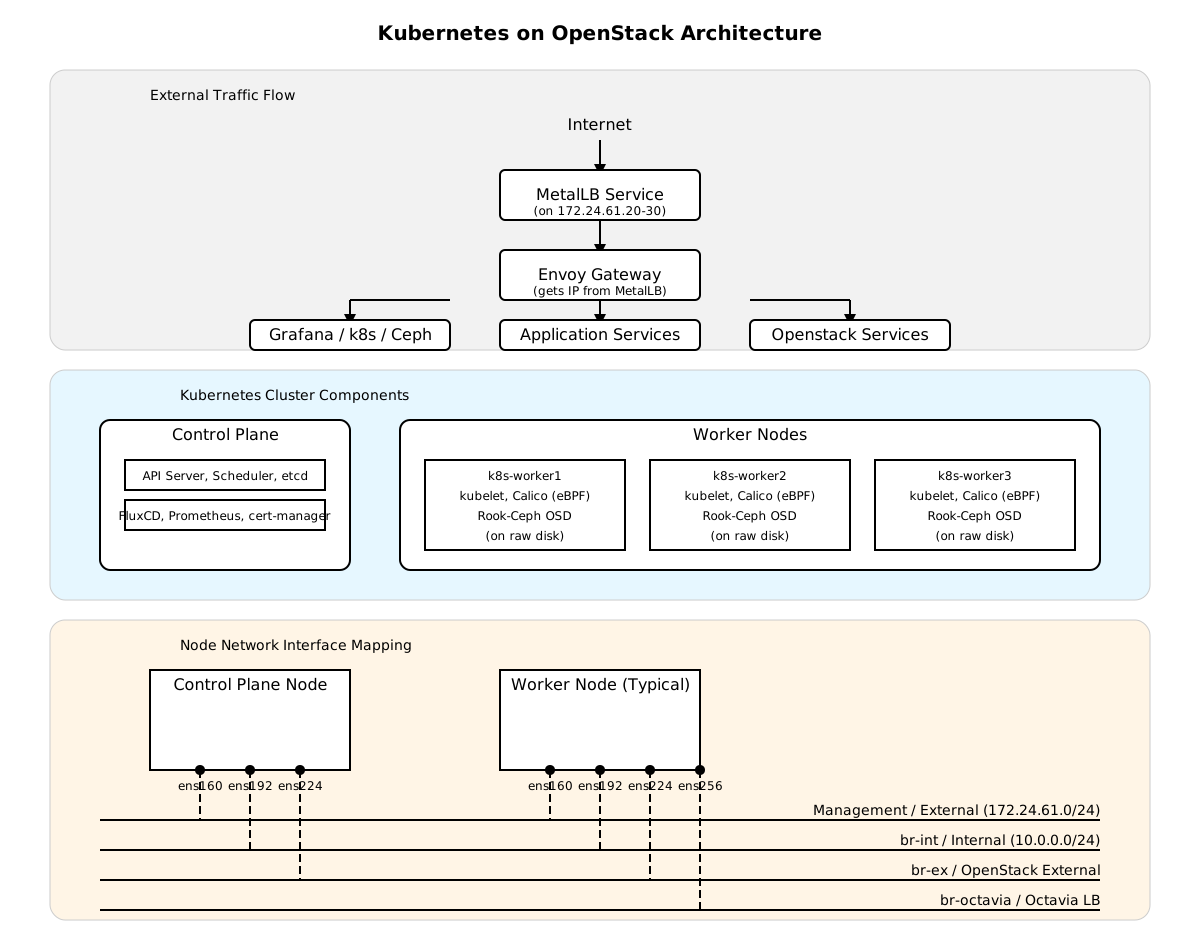
Here’s a breakdown of the layers:
┌──────────────────────────────────────────────────────────────────┐
│  Git Repository (this repo)                                      │
│  FluxCD config + Helm value overrides only                       │
│  charts/ = READ-ONLY upstream 2026.1.0 (never modified)          │
└───────────────────────┬──────────────────────────────────────────┘
                        │ FluxCD reconciles
                        ▼
┌──────────────────────────────────────────────────────────────────┐
│  Kubernetes Cluster (prod / region1)                             │
│                                                                  │
│  Infrastructure layer (Ansible-managed, pre-deployed)            │
│  ├── MetalLB L2           gateway VIP: 172.24.61.20              │
│  ├── Envoy Gateway        gateway-default / envoy-gateway-system │
│  ├── cert-manager         TLS automation                         │
│  ├── Rook-Ceph            RBD block storage                      │
│  └── FluxCD               GitOps controllers                     │
│                                                                  │
│  openstack namespace (FluxCD-managed)                            │
│  ├── PKI: selfsigned-bootstrap → openstack-ca (internal TLS)    │
│  ├── Infrastructure: rabbitmq, mariadb, memcached, redis, etcd   │
│  ├── Storage: ceph-adapter-rook                                  │
│  ├── Networking: openvswitch, ovn, libvirt                       │
│  ├── Core: keystone, glance, cinder, placement, neutron, nova    │
│  ├── Extended: barbican, heat, magnum, octavia, designate        │
│  ├── Dashboard: skyline                                          │
│  └── Monitoring: prometheus, mysql-exporter, os-exporter         │
└──────────────────────────────────────────────────────────────────┘All public-facing services are exposed via a single external IP (172.24.61.20) and are accessible via https://<service>.172.24.61.20.nip.io.
Key Design Decisions#
This setup incorporates several important design choices to ensure a robust and maintainable production environment.
Helm Hook Removal in 2026.1.0#
OpenStack-Helm 2026.1.0 has removed support for Helm 2, and with it, the helm3_hook value. All jobs (like database initialization, user creation, etc.) are now standard Kubernetes Job resources.
- Job Ordering: Instead of Helm hooks, job execution order is managed by
kubernetes-entrypointinit containers within each service pod. These containers check a list of static dependencies (dependencies.static.<component>.jobs) and wait for required jobs to reach theCompletedstate before allowing the main service container to start. - Job Protection: To prevent FluxCD or Helm from deleting completed jobs during reconciliation, we apply a global patch to all
Jobresources, settinghelm.sh/resource-policy: keep. This is critical for stability. To re-run a job (e.g., after an upgrade), you must manually delete it first.
Cluster-Managed Gateway#
The Gateway resource, which defines how traffic enters the cluster, is managed by our Ansible playbooks from the previous guide, not by FluxCD. This separates the core ingress infrastructure from the application layer.
- Gateway Name:
gateway-default - Gateway Namespace:
envoy-gateway-system - TLS: A single wildcard certificate (
gateway-wildcard-tls) covers all*.{ip}.nip.iosubdomains. - Cross-Namespace Routing: The gateway is configured to allow
HTTPRouteresources from any namespace to attach to it, which is how ouropenstacknamespace exposes its services.
Only the HTTPRoute resources, which map paths to OpenStack services, are managed via GitOps.
HTTPS-Only Public Endpoints#
Security is paramount. All public-facing OpenStack endpoints are configured for HTTPS only (scheme.public: https on port 443). A global HTTPRoute is set up to automatically redirect any incoming HTTP (port 80) traffic to its HTTPS equivalent. Internal cluster communication between OpenStack services remains plain HTTP for performance.
Internal Public Key Infrastructure (PKI)#
The deployment establishes its own internal PKI using cert-manager, completely separate from the gateway’s TLS certificate. This is used for securing internal components like MariaDB and RabbitMQ with mTLS.
The chain of trust is:
selfsigned-bootstrap (ClusterIssuer) -> openstack-ca (Certificate) -> openstack-ca (ClusterIssuer) -> per-service certificates
Repository Structure#
A well-organized GitOps repository is key. Here is the layout:
charts/                              # READ-ONLY upstream 2026.1.0 charts
clusters/
└── prod/
    ├── flux-system/                 # Flux GitSource + Kustomization entries
    └── region1/
        └── openstack/
            ├── kustomization.yaml
            ├── patch-helmrelease-openstack-gitops.yaml   # Global patch for Jobs
            ├── patch-helmrelease-timeouts.yaml
            ├── pki/                 # Internal PKI bootstrap manifests
            ├── releases/            # HelmRelease manifests (one per chart)
            ├── values/              # Helm value overrides as ConfigMaps
            │   ├── credentials.yaml (SOPS-encrypted)
            │   └── ...
            └── gateway/
                └── httproutes.yaml  # HTTPRoutes for OpenStack services
.sops.yaml # SOPS age key configurationPrerequisites#
Cluster Infrastructure#
This guide assumes you have a running Kubernetes cluster with the following components, as configured in our previous article:
| Component | Purpose |
|---|---|
| MetalLB | Provides the VIP 172.24.61.20 for the gateway. |
| Envoy Gateway | Manages ingress traffic via the gateway-default. |
| cert-manager | Automates TLS certificate management. |
| Rook-Ceph | Provides RBD block storage for Cinder and Glance. |
| FluxCD | Powers the GitOps reconciliation loop. |
Admin Workstation Setup#
You’ll need the following tools on your local machine to manage the deployment:
# Install SOPS and age for credential encryption
sudo apt update && sudo apt install -y age
curl -LO curl -LO https://github.com/getsops/sops/releases/download/v3.13.2/sops-v3.13.2.linux.amd64
sudo install sops-v3.13.2.linux.amd64 /usr/local/bin/sopsDeployment Walkthrough#
Step 1: Node Preparation#
First, prepare your Kubernetes worker nodes. OpenStack components require higher inotify limits for monitoring file changes. We also need to label the nodes so that the OpenStack-Helm charts can correctly schedule pods.
# Increase inotify limits on all worker nodes
for NODE in k8s-worker1 k8s-worker2 k8s-worker3; do
  ssh $NODE "sudo sysctl -w fs.inotify.max_user_watches=524288 && \
             sudo sysctl -w fs.inotify.max_user_instances=1024"
done

# Label nodes for OpenStack roles
for NODE in k8s-worker1 k8s-worker2 k8s-worker3; do
  kubectl label --overwrite nodes $NODE \
    openstack-control-plane=enabled \
    openstack-compute-node=enabled \
    openvswitch=enabled \
    l3-agent=enabled \
    openstack-network-node=enabled
done

# Create the target namespace
kubectl create namespace openstackStep 2: Credential Encryption with SOPS#
Never commit plain-text secrets to Git. We use SOPS with age to encrypt our credentials.yaml file.
-
Generate an age keypair:
bashage-keygen -o age.agekey # This will output a public key, e.g., age1ql3z... -
Store the private key in the cluster: FluxCD needs the private key to decrypt the credentials.
bashkubectl create secret generic sops-age \ --namespace=flux-system \ --from-file=age.agekey=./age.agekey -
Configure and encrypt: Add the public key to your
.sops.yamlfile. Then, populateclusters/prod/region1/openstack/values/credentials.yamlwith your desired passwords and encrypt it.
bashsops --encrypt --in-place clusters/prod/region1/openstack/values/credentials.yamlYou can now safely commit the encrypted file. To edit it later, simply run
sops clusters/prod/region1/openstack/values/credentials.yaml, which will open it in your default editor and re-encrypt on save. -
Example
credentials.yamlfile Use this file as example for you repoclusters/prod/region1/openstack/values/credentials.yaml
yaml# ============================================================ # SOPS ENCRYPTION REQUIRED BEFORE COMMITTING TO GIT # # Steps: # 1. Fill in all Password1 # 2. Run: sops --encrypt --in-place clusters/prod/openstack/values/credentials.yaml # 3. Only then: git add clusters/prod/openstack/values/credentials.yaml && git commit # # To edit after encryption: # sops clusters/prod/openstack/values/credentials.yaml # ============================================================ apiVersion: v1 kind: Secret metadata: name: openstack-credentials namespace: openstack stringData: values.yaml: |- endpoints: identity: auth: admin: password: Password1 cinder: password: Password1 glance: password: Password1 nova: password: Password1 swift: password: Password1 service: password: Password1 test: password: Password1 keystone: password: Password1 neutron: password: Password1 barbican: password: Password1 placement: password: Password1 heat: password: Password1 heat_trustee: password: Password1 heat_stack_user: password: Password1 magnum: password: Password1 magnum_stack_user: password: Password1 mariadb-server: password: Password1 octavia: password: Password1 designate: password: Password1 ironic: password: Password1 skyline: password: Password1 user: password: Password1 oslo_db: auth: admin: username: root password: Password1 keystone: username: keystone password: Password1 nova: username: nova password: Password1 nova_api: username: nova_api password: Password1 nova_cell0: username: nova_cell0 password: Password1 neutron: username: neutron password: Password1 cinder: username: cinder password: Password1 glance: username: glance password: Password1 placement: username: placement password: Password1 heat: username: heat password: Password1 barbican: username: barbican password: Password1 magnum: username: magnum password: Password1 octavia: username: octavia password: Password1 designate: username: designate password: Password1 powerdns: username: powerdns password: Password1 sst: username: sst password: Password1 audit: username: audit password: Password1 exporter: username: exporter password: Password1 skyline: username: skyline password: Password1 oslo_db_persistence: auth: admin: username: root password: Password1 octavia: username: octavia password: Password1 oslo_db_api: auth: admin: username: root password: Password1 nova: username: nova password: Password1 oslo_db_cell0: auth: admin: username: root password: Password1 nova: username: nova password: Password1 ceph_object_store: auth: glance: username: glance password: Password1 tempurlkey: supersecret oslo_messaging: auth: admin: username: rabbitmq password: Password1 user: username: rabbitmq password: Password1 guest: password: Password1 keystone: username: keystone password: Password1 nova: username: nova password: Password1 neutron: username: neutron password: Password1 cinder: username: cinder password: Password1 glance: username: glance password: Password1 heat: username: heat password: Password1 barbican: password: Password1 magnum: username: magnum password: Password1 octavia: username: octavia password: Password1 designate: username: designate password: Password1 powerdns: auth: admin: password: Password1 oci_image_registry: auth: barbican: username: barbican password: Password1 cinder: username: cinder password: Password1 designate: username: designate password: Password1 etcd: username: etcd password: Password1 glance: username: glance password: Password1 heat: username: heat password: Password1 keystone: username: keystone password: Password1 libvirt: username: libvirt password: Password1 magnum: username: magnum password: Password1 mariadb: username: mariadb password: Password1 memcached: username: memcached password: Password1 neutron: username: neutron password: Password1 nova: username: nova password: Password1 octavia: username: octavia password: Password1 openvswitch: username: openvswitch password: Password1 ovn: username: ovn password: Password1 placement: username: placement password: Password1 powerdns: username: powerdns password: Password1 prometheus: username: prometheus password: Password1 prometheus-mysql-exporter: username: prometheus-mysql-exporter password: Password1 prometheus-openstack-exporter: username: prometheus-openstack-exporter password: Password1 rabbitmq: username: rabbitmq password: Password1 redis: username: redis password: Password1 skyline: username: skyline password: Password1
Step 3: Bootstrap FluxCD#
Point FluxCD at your Git repository to kick off the deployment.
# Run a pre-flight check
flux check --pre

# Bootstrap FluxCD against your GitLab repository
flux bootstrap gitlab \
  --owner=<your-gitlab-group> \
  --repository=openstack-helm \
  --branch=main \
  --path=clusters/prod/flux-system \
--token-authStep 4: Monitor the Deployment#
Once Flux is bootstrapped, it will begin deploying the HelmRelease resources. The kubernetes-entrypoint logic enforces a specific order.
You can watch the progress:
# Watch all HelmReleases in the openstack namespace
flux get helmreleases -n openstack --watch

# Stream logs from the helm-controller for detailed info
kubectl logs -n flux-system deploy/helm-controller -fThe deployment will proceed in stages, starting with infrastructure services like MariaDB and RabbitMQ, then core services like Keystone, and finally the extended services and dashboard.
Accessing Your OpenStack Cloud#
Once the deployment is complete, all services will be available at their respective nip.io URLs.
Service Catalog#
| Service | Public URL | Notes |
|---|---|---|
| Keystone | https://keystone.172.24.61.20.nip.io/v3 | Identity & Auth |
| Skyline | https://skyline.172.24.61.20.nip.io | Web Dashboard |
| Nova | https://nova.172.24.61.20.nip.io/v2.1 | Compute API |
| NoVNC | https://novnc.172.24.61.20.nip.io | VM Console Access |
| Cinder | https://cinder.172.24.61.20.nip.io/v3 | Block Storage (Ceph RBD) |
| Glance | https://glance.172.24.61.20.nip.io | Image Service (Ceph RBD) |
| Neutron | https://neutron.172.24.61.20.nip.io | Networking (OVN) |
| Placement | https://placement.172.24.61.20.nip.io | Resource Inventory |
| Heat | https://heat.172.24.61.20.nip.io/v1 | Orchestration |
| Barbican | https://barbican.172.24.61.20.nip.io | Key/Secret Manager |
| Magnum | https://magnum.172.24.61.20.nip.io/v1 | Kubernetes as a Service |
| Octavia | https://octavia.172.24.61.20.nip.io | Load Balancer as a Service |
| Designate | https://designate.172.24.61.20.nip.io/v2 | DNS as a Service |
Trusting the Gateway CA#
Since the gateway uses a self-signed certificate, you must configure your local environment to trust it.
# Extract the CA certificate from the cluster
kubectl get secret gateway-wildcard-tls -n envoy-gateway-system \
  -o jsonpath='{.data.ca\.crt}' | base64 -d > gateway-ca.crt

# For the OpenStack CLI, set the OS_CACERT environment variable
export OS_CACERT=/path/to/your/gateway-ca.crtVerifying the Deployment#
With the CA configured, you can use the openstack CLI to interact with your new cloud.
-
Install the client libraries:
bashpip install python-openstackclient python-magnumclient \ python-octaviaclient python-heatclient python-designateclient -
Configure
clouds.yaml:~/.config/openstack/clouds.yaml
yamlclouds: openstack_helm: region_name: RegionOne identity_api_version: 3 cacert: /path/to/your/gateway-ca.crt auth: username: admin password: <your-admin-password> project_name: admin project_domain_name: default user_domain_name: default auth_url: https://keystone.172.24.61.20.nip.io/v3 EOF -
Set the active cloud and test:
bashexport OS_CLOUD=openstack_helm openstack endpoint list openstack compute service list openstack network agent list
Maintenance and Troubleshooting#
The GitOps model simplifies maintenance. To upgrade OpenStack, you would update the image tags in your values ConfigMaps, commit, and push. FluxCD handles the rolling update.
If a HelmRelease gets stuck, use flux get helmreleases and kubectl describe helmrelease to diagnose the issue. If a pod is stuck in Init, check the status of its dependency jobs with kubectl get jobs -n openstack.
This setup provides a powerful, declarative, and version-controlled foundation for running a production OpenStack cloud on Kubernetes.
Networking Deep Dive: Neutron with OVN and Open vSwitch#
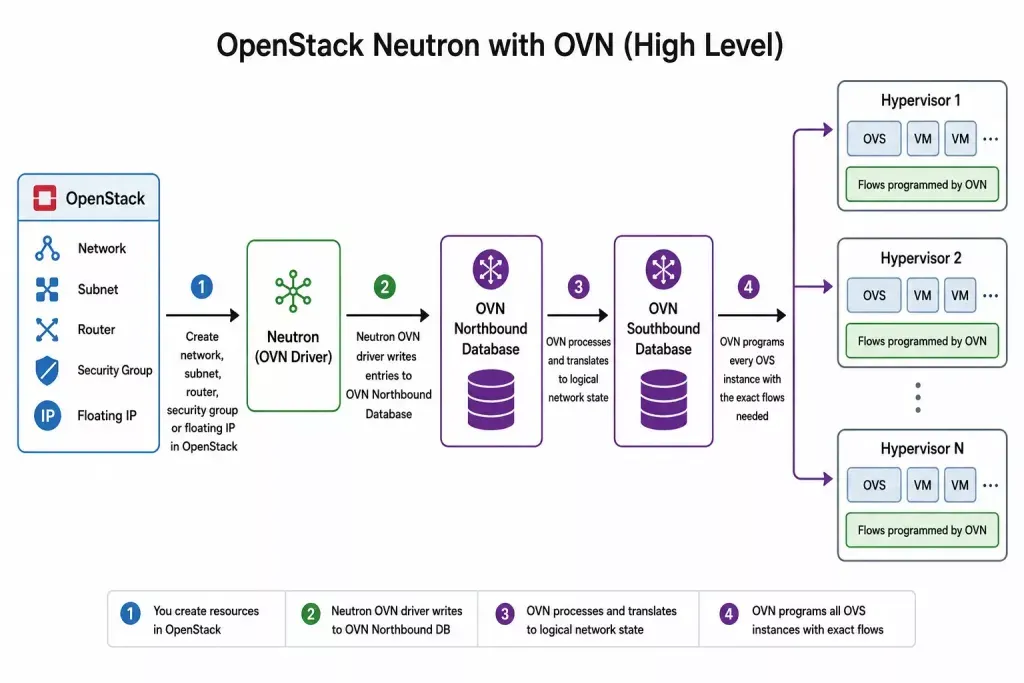
Our OpenStack deployment leverages the power of Open Virtual Network (OVN) as the backend for Neutron, the OpenStack Networking service. This modern architecture uses OVN and Open vSwitch (OVS) to provide a scalable and efficient software-defined network (SDN).
What is Open vSwitch (OVS)?#
Think of Open vSwitch as a smart, software-based network switch that runs on every compute node in our Kubernetes cluster. [1] It operates at the data link layer (Layer 2) and is responsible for the actual forwarding of network packets between virtual machines. [2] Just like a physical switch, it learns MAC addresses to direct traffic to the correct destination. [2]
What is OVN (Open Virtual Network)?#
If OVS is the muscle, OVN is the brain. OVN is a control plane for OVS, providing a higher-level abstraction for virtual networking. [1] It takes the logical network concepts from Neutron—such as virtual networks, routers, subnets, and security groups—and translates them into rules that OVS can understand. [3]
How They Work Together#
The synergy between OVN and OVS is what makes the networking stack so powerful:
- When you make a request to the Neutron API (e.g., “create a new network”), Neutron communicates this to OVN’s Northbound database.
- A central OVN component,
ovn-northd, translates this high-level request into logical flows in the OVN Southbound database. [3] - On each compute node, an agent called
ovn-controlleris constantly watching the Southbound database. It takes the logical flows and converts them into specific, physical OpenFlow rules for the local OVS instance. [3] - OVS then uses these rules to forward packets for the VMs running on that node.
This architecture replaces the legacy collection of Python-based Neutron agents (like neutron-l3-agent, neutron-dhcp-agent) with a more robust, centralized, and database-driven control plane. [3] This results in better performance, greater scalability, and a simplified overall network architecture. [5]
Traffic Patterns: East-West vs. North-South#
OVN handles two primary traffic patterns very differently, which is key to its efficiency.
East-West Traffic (Internal)#
East-West traffic refers to all communication between workloads inside the OpenStack cloud. This includes:
- VM-to-VM communication within the same tenant network.
- Traffic between VMs in different networks that is routed through a virtual router.
This traffic stays within the OVN overlay network, encapsulated in tunnels (like Geneve or VXLAN). It is highly efficient because it doesn’t need to traverse the physical network gateway, making it ideal for backend services, database replication, and internal API calls.
North-South Traffic (External)#
North-South traffic is any communication between an internal workload and the outside world. Examples include:
- A user accessing a web server on a VM via a Floating IP.
- A VM downloading software updates from the internet.
This traffic must leave the OVN overlay and travel through a gateway to the physical network. In our Neutron setup, this is handled by:
- Virtual Routers: With gateway ports connected to a provider network (like the
external-netwe create later). - Floating IPs: Which use Network Address Translation (NAT) to map a public IP to a VM’s private IP.
Post-Deployment: Creating a Magnum Kubernetes Cluster#
Now that your OpenStack cloud is running, a common next step is to use Magnum (Container Orchestration Engine) to create Kubernetes clusters for your tenants. This section guides you through creating the necessary networking and templates.
Step 1: Create External Network and Subnet (via Skyline)#
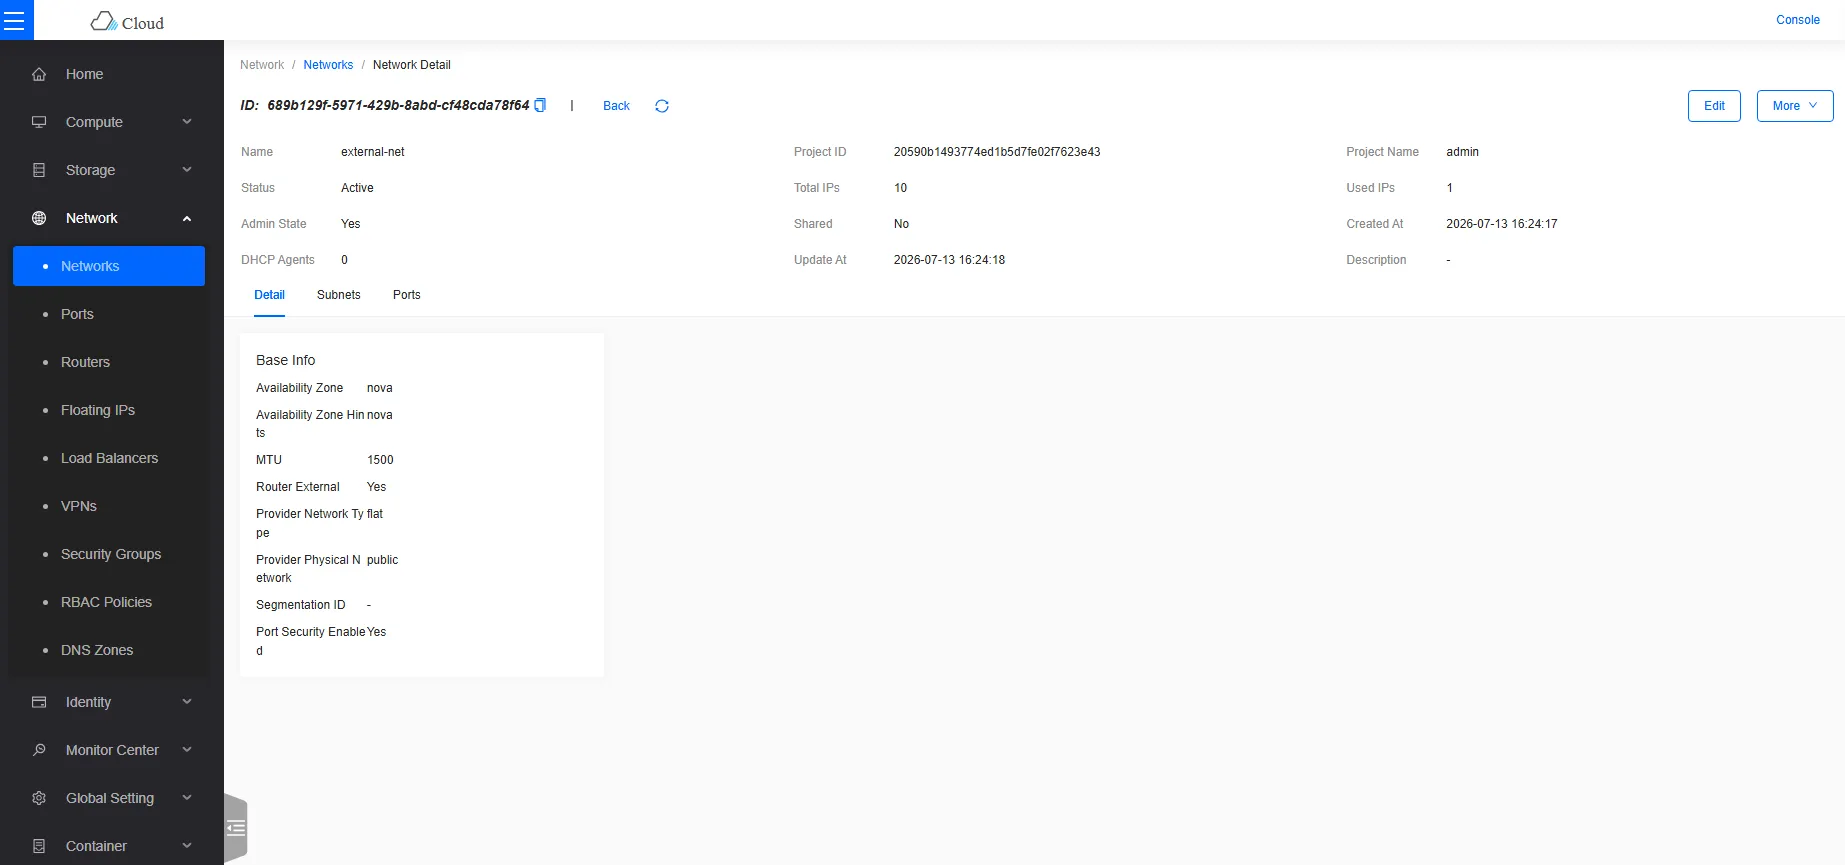
Before tenants can create clusters with public IPs, you need an external network in you Administrator tenant.
- Log in to the Skyline dashboard (
https://skyline.172.24.61.20.nip.io) as theadminuser. - Navigate on Administrator
- Navigate to Network > Networks.
- Click Create Network.
- Give it a name, for example,
external-net. - Check the External Network box.
- Proceed to create a subnet for this network. Define an IP range that is routable in your physical environment but does not overlap with other services (e.g.,
172.24.61.100-172.24.61.150). Set the gateway IP for this subnet. - Click on Console to go back to the Skyline dashboard.
Step 2: Create a Router#
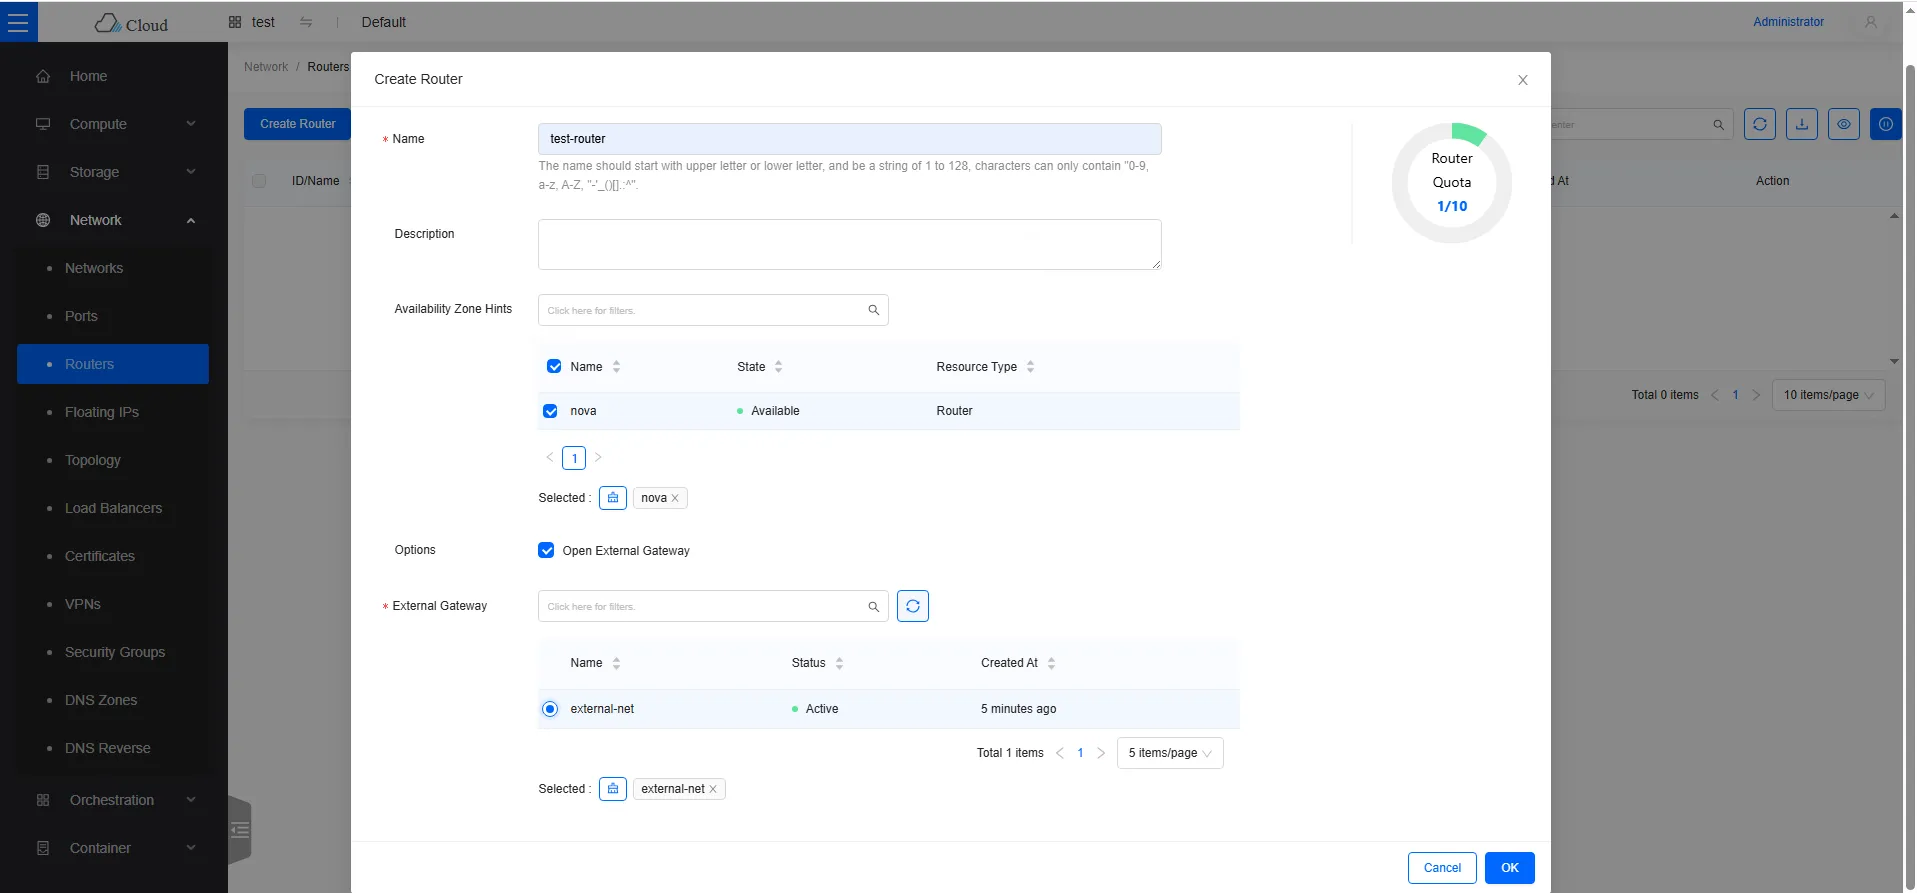
To connect your private tenant networks to the new external network, you need a router.
- In Skyline, go to Network > Routers.
- Click Create Router.
- Give it a name (e.g.,
provider-router). - After creation, click on the router and set its gateway to the
external-netyou created. - You can then add interfaces to connect this router to existing private tenant networks.
Step 3: Prepare Fedora CoreOS Image for Magnum#
Magnum uses specific images to boot Kubernetes nodes. Fedora CoreOS is a common choice. The following commands should be run on a machine with the OpenStack CLI installed and configured.
# Set the desired Fedora CoreOS version
export FCOS_VERSION="35.20220116.3.0"

# Download the image
wget https://builds.coreos.fedoraproject.org/prod/streams/stable/builds/${FCOS_VERSION}/x86_64/fedora-coreos-${FCOS_VERSION}-openstack.x86_64.qcow2.xz

# Decompress the image
unxz fedora-coreos-${FCOS_VERSION}-openstack.x86_64.qcow2.xz

# Upload the image to Glance
openstack image create \
  --public \
  --disk-format=qcow2 \
  --container-format=bare \
  --file=fedora-coreos-${FCOS_VERSION}-openstack.x86_64.qcow2 \
  --property os_distro='fedora-coreos' \
fedora-coreos-latestThis makes a public image named fedora-coreos-latest available in Glance for Magnum to use.
Step 4: Create the Magnum Cluster Template#
A cluster template defines the parameters for creating Kubernetes clusters. This command creates a template that uses the Fedora CoreOS image and Calico for networking.
openstack coe cluster template create k8s-cluster-template \
  --image fedora-coreos-latest \
  --keypair <your-keypair-name> \
  --external-network external-net \
  --dns-nameserver 8.8.8.8 \
  --master-flavor m2.small \
  --flavor m2.small \
  --docker-volume-size 15 \
  --network-driver calico \
  --volume-driver cinder \
  --coe kubernetes \
  --public \
--labels kube_tag=v1.28.9-rancher1,container_runtime=containerd,containerd_version=1.6.31,containerd_tarball_sha256=75afb9b9674ff509ae670ef3ab944ffcdece8ea9f7d92c42307693efa7b6109d,cloud_provider_tag=v1.27.3,cinder_csi_plugin_tag=v1.27.3,k8s_keystone_auth_tag=v1.27.3,magnum_auto_healer_tag=v1.27.3,octavia_ingress_controller_tag=v1.27.3,calico_tag=v3.26.4Note: Replace
<your-keypair-name>with the name of an SSH keypair you have already uploaded to OpenStack.
With this template, users can now run openstack coe cluster create ... --cluster-template k8s-cluster-template to provision their own Kubernetes clusters.
Bonus: Uploading a General-Purpose Ubuntu Image#
It’s also useful to have standard cloud images for creating regular virtual machines. Here is how you can upload an Ubuntu 24.04 image.
# Download the Ubuntu cloud image
wget https://cloud-images.ubuntu.com/noble/current/noble-server-cloudimg-amd64.img -O ubuntu-24.04-server.img

# Upload the image to Glance
openstack image create \
  --disk-format qcow2 \
  --container-format bare \
  --public \
  --property os_type=linux \
  --file ubuntu-24.04-server.img \
ubuntu-24.04-serverDeployment in Action#
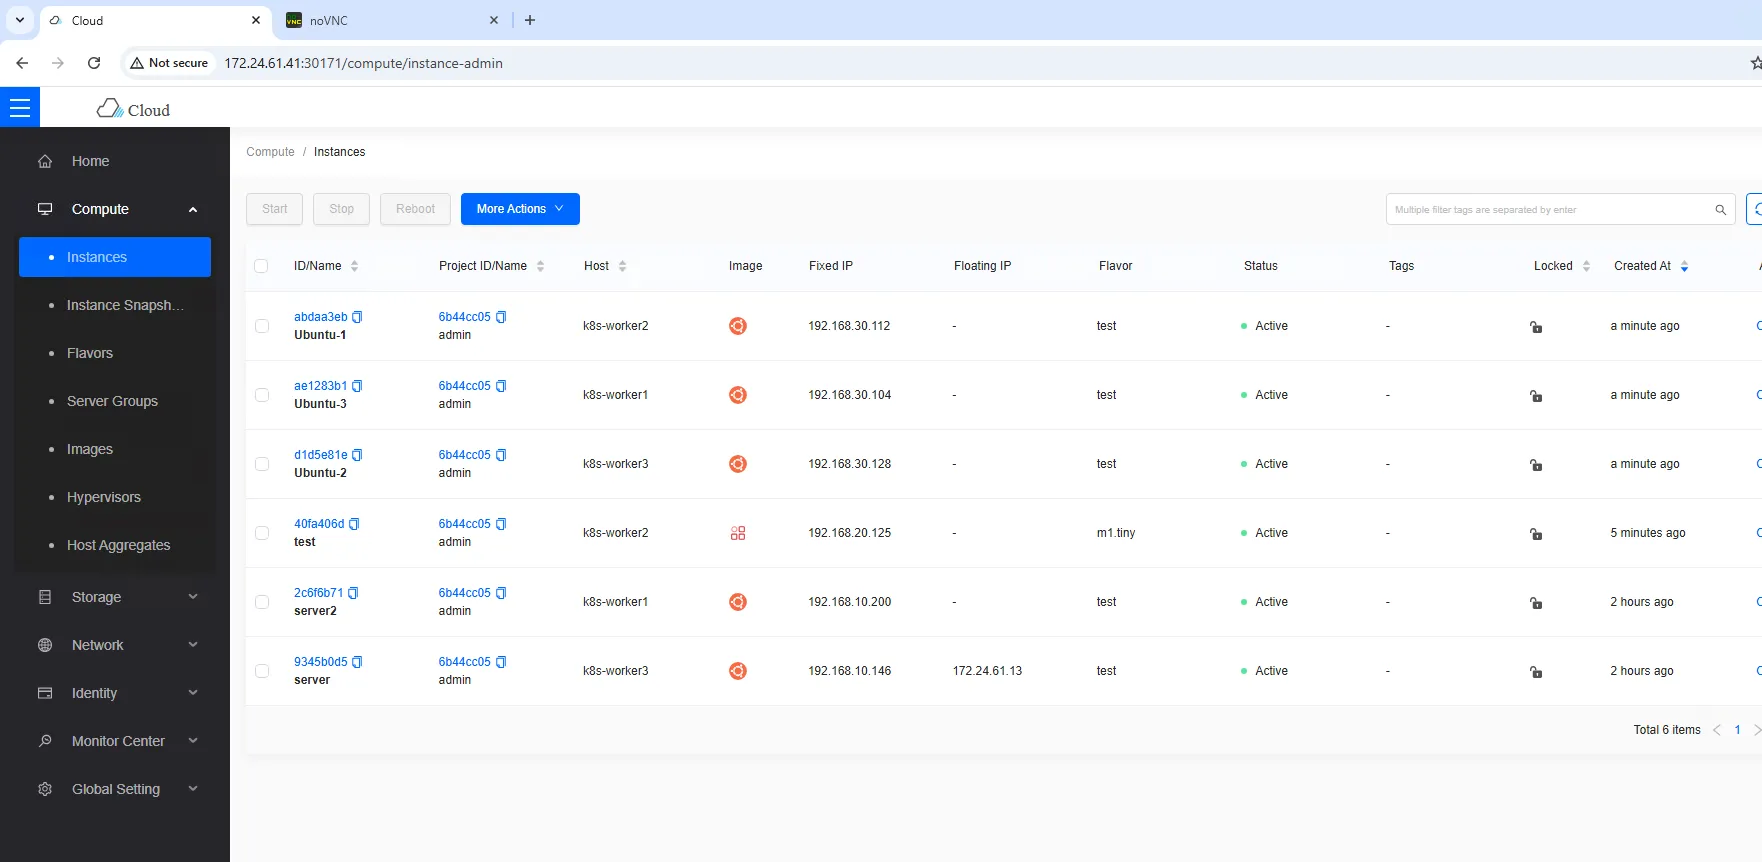
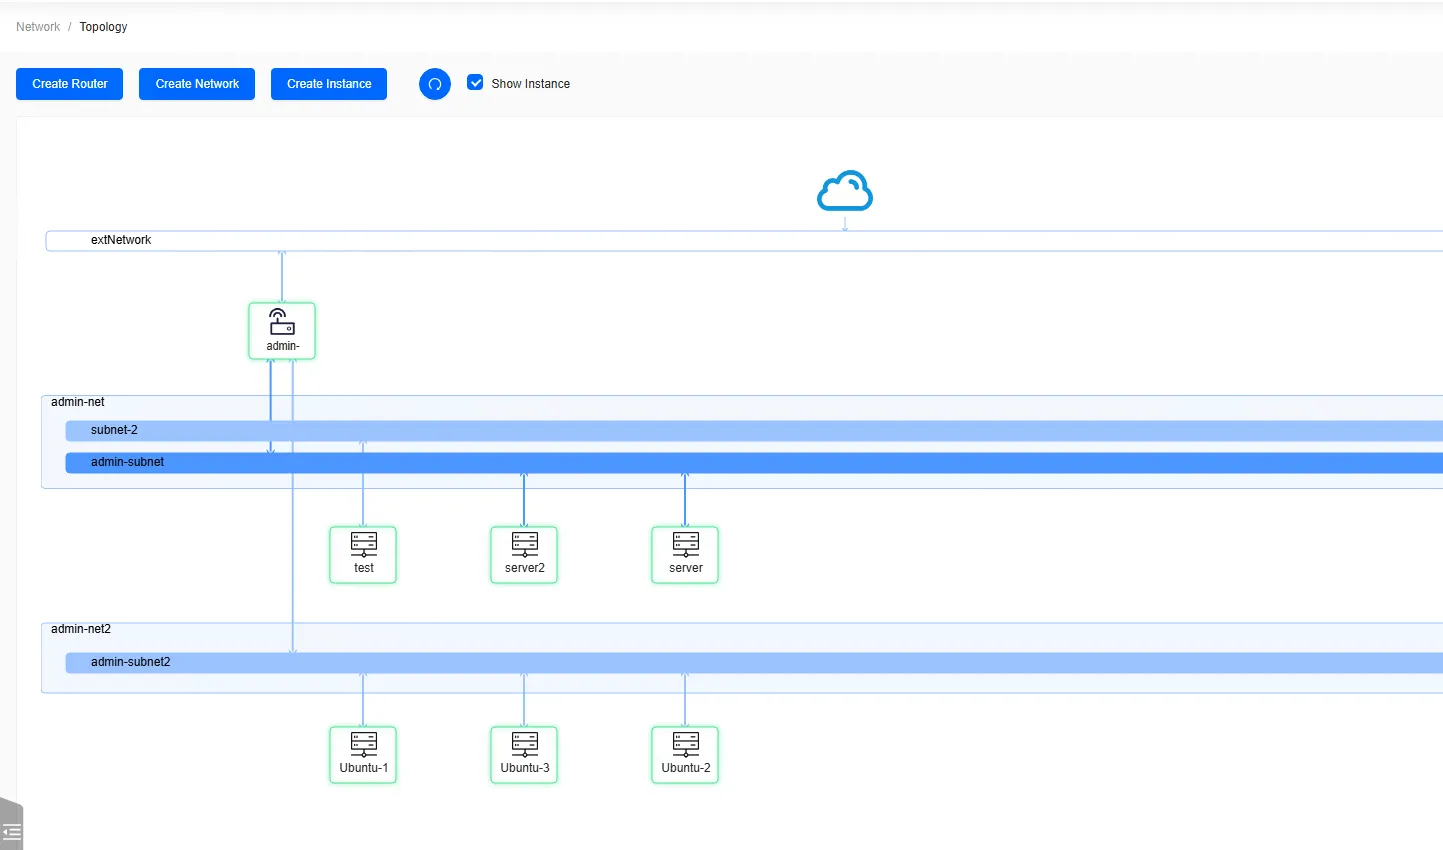
Here are some snapshots from the openstack-helm stack